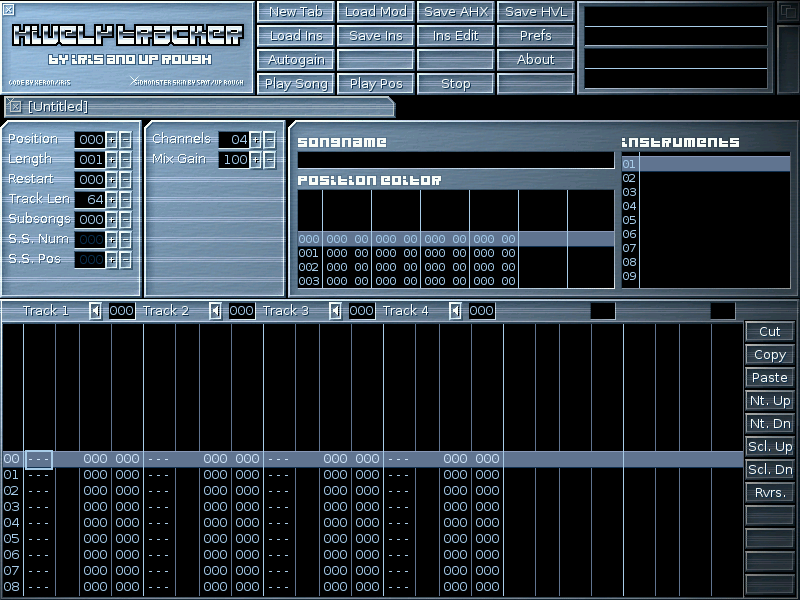
When you first start HivelyTracker, you should be presented with an interface like this:
REMEMBER: Almost every input area in the GUI works with the mousewheel. Often this is the fastest and easiest method!
Along the top row next to the logo is the button panel. The following table lists the button functions:| Button | Left click | Right click |
| New Tab | Opens a new tab. Right click to create a clone of the current tab. | |
| Load Mod | Loads an AHX or HVL song into the current tab | |
| Save AHX | Saves the current song as AHX format | |
| Save HVL | Saves the current song as HVL format | |
| Load Ins | Loads an AHX or HVL instrument | |
| Save Ins | Saves an AHX or HVL instrument | |
| Prefs | Opens the preferences window | |
| Autogain | Calculates optimal mix gain for the current song (see mixing notes) | |
| Undo | Undoes the last thing you changed. Right click to redo changes. | |
| About | Opens the about window | |
| Play Song | Plays the song from the top of the current position | Continues the song from the current position |
| Play Pos | Plays the current position from the top | Continues the current position |
| Stop | Stops the song and any audio | Stops the song and any audio |
To the right of the button panel are the stereo scopes.
Underneath that first row are the tabs. You can have multiple songs loaded into HivelyTracker, and each one will have a tab here. You simple click on the relevant tab to select the desired song.
Beneath the tabs is the tracker panel. Here is where you edit the songs. The fundamental building blocks of AHX and HVL tunes are "tracks". A track is a list of notes and commands that are parsed from top to bottom. Several of these tracks are parsed in parallel (4 for AHX songs, up to 16 for HVL songs). A song can contain up to 256 of these tracks, and they can be played in any order.
The "position editor" defines the order in which the tracks are played. A song can have up to 1000 positions, and each position records which track should be played, and a transpose value for each channel. The position editor shows the track number and transpose value for each channel as a 3 digit decimal number and 2 digit hexadecimal number respectively. The track number is simply 0 - 255 for the track number. The transpose value is 00 - 7F to transpose up "n" semitones, and 80-FF to transpose down "n" semitones (where FF is -1, FE is -2 etc. etc.)
To the left of the position editor are two columns of numberboxes. They are:
| Name | Function |
| Position | This is the current position in the song. Changing this numberbox will update the position editor and the track editor |
| Length | This is the length of the song in positions. Once the end of position "Length - 1" is reached, the song jumps to the position in the restart box |
| Restart | This is the position number to jump to once the end of the song is reached |
| Track Len | This is the length of the tracks from 1 to 64 |
| Subsongs | This is the number of "subsongs". An AHX or HVL song file can contain a number of extra songs after the main one. This is the number of extra subsongs to include, not including the main one |
| S.S. Num | This is the number of the subsong that you are currently editing. When you change this numberbox, the position editor is set to the starting position of this subsong |
| S.S. Pos | This is the starting position of the current subsong. For example, the main song might be 24 positions long (0 to 23), and subsong 1 could start at 24 |
| Channels | This is the number of channels in the song. AHX songs can only have 4 channels |
| Mix Gain | This sets the mix gain (see mixing notes) |
Below the position editor is the track editor. Unlike AHX, the track editor is ALWAYS synced to the current position in the song. So, if a 4 channel song had tracks "1", "20", "0" and "0" at the current position, the track editor will show tracks 1, 20, 0 and 0 in the four columns. You can change the track number at a given position by going to the position editor (press ENTER if the track editor is active, or click in it), using the cursor keys to get to the track number you wish to change and typing in a new track number on the keyboard. Alternatively, you can just use the mousewheel in the "track number" box to the right of the mute button for the given channel. The track editor has to be in edit mode before you can put notes or commands into a track. Space toggles edit mode.
Each track in the track editor is split into 3 columns; the note column and two command columns. In edit mode, you use the keyboard like a piano keyboard to write notes into the track. The bottom row starting from the bottom left alphabet key (Z on english and us keyboards) is the low octave keyboard (on GB keyboard, Z = C, S = C#, X = D and so on). The top alphabetical row and the numerical row act as the high octave keyboard (on GB keyboard, Q = C, 2 = C#, W = D etc.). AHX and HVL has 5 octaves. Pressing F1 sets the low octave keys as octave 1, and the high octave keys as octave 2. F2 sets octaves 2&3, F3 sets 3&4, F4 sets 4&5 and F5 sets 5.
Using the cursor keys, you can move the cursor over to the command rows to insert commands. Commands are 3-digit hexadecimal numbers, where the first digit is the command type, and the second two are the effect parameter. See the command reference for more information.
HivelyTracker won't make any noise without instruments. Songs can have up to 63 different instruments. Instruments can be loaded in from disk. The "Load Ins" button loads an instrument file into the current instrument slot. You can change the currently active instrument slot with the numerical keypad (see keyboard reference), or by simply rolling the mousewheel over the instrument list to the right of the position editor.
When you insert notes into tracks, usually it will have an instrument number next to it. For example, "C#1 01" means play C#1 on instrument one. There is an "empty" instrument, which is instrument 0. This shows up as "C#1" with no number next to it. This changes the note of any currently playing sound in the channel without starting any new instrument noises.
Pressing "Ins Ed" takes you into the instrument editor:
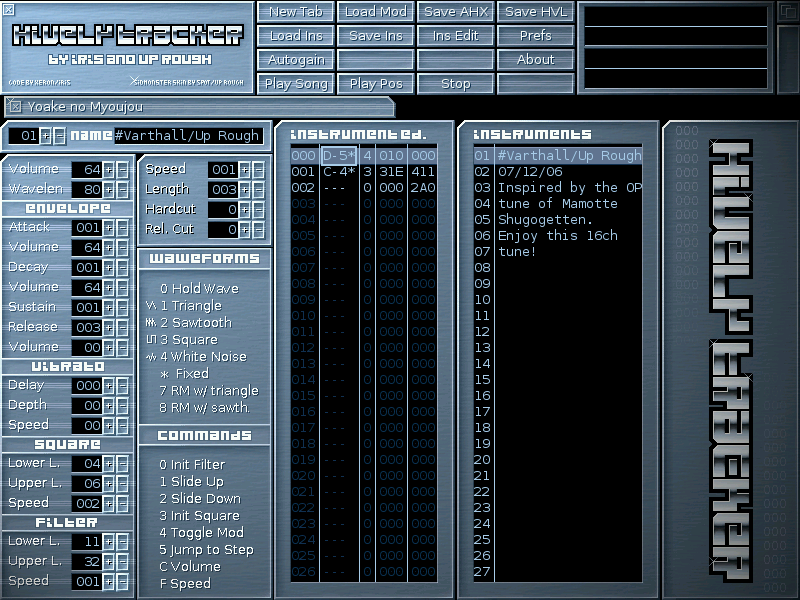
The instrument editor allows you to create or modify instruments. At the top is the slot number and name of the current instrument. Down the left hand side are a number of parameters you can change:
| Name | Function |
| Volume | This is the master volume for this instrument |
| Wavelen | This is the wavelength of the oscillators for this instrument. The higher the value, the lower the pitch of the instrument |
| Envelope | |
| Attack | All instruments start with a volume of 0, and build to the attack volume. The lower this value is, the faster it gets to the attack volume. A value of one means that it instantly reaches this volume |
| Volume | This is the volume to reach after the attack period |
| Decay | After the attack volume is reach it fades to the decay volume. The larger the decay value, the longer this takes |
| Volume | This is the volume to reach after the decay period |
| Sustain | This is how long to hold the decay volume level for |
| Release | After the sustain period, the volume fades to the release volume level. This sets how long that takes |
| Volume | This is the volume to reach after the relase period |
| Vibrato | |
| Delay | This is the amount of time to wait before activating the vibrato effect, if any |
| Depth | This is how much the vibrato modifies the frequency of the note (0 = no vibrato) |
| Speed | This is how fast the vibrato effect is. The smaller the number, the faste it goes |
| Square | |
| Lower L. | Sets the lower limit for square relation modulation. |
| Upper L. | Sets the upper limit for square relation modulation |
| Speed | Sets the speed for square relation modulation |
| Filter | |
| Lower L. | Sets the lower limit for filter modulation |
| Upper L. | Sets the upper limit for filter modulation |
| Speed | Sets the speed for filter modulation |
| - | |
| Speed | Sets the speed at which the performance list is parsed |
| Length | Sets the length of the performance list |
| Hard Cut | Sets a cut-off time before a new note is played for a previous one to stop |
| Rel. Cut | Toggles release cut |
To the right of these parameters is the "performance list". This defines the waveforms and notes that make up the instrument. Like the tracks, it is made up of a list of notes and commands. The commands are similar, but slightly different to the track commands (see command reference).
Like in the track editor, Space toggles between "free play" and "edit" mode. In edit mode, you can insert notes into the performance list using the keyboard as a piano-style keyboard. You can toggle the "fixed" parameter next to any note by hitting enter while in edit mode. Fixed notes have an asterisk (*) next to them. Fixed notes always play at the frequency of the note in the performance list (so, if the performance list has "C#1*", that will always play the note C#1, no matter what note is in the main track. Unfixed notes are added to the main track note, for example, if an instrument has "C#1" at the first position of the performance list, and the track has "C-1 n", where n is the instrument number, the instrument will actually play "C#1". If the track had "D-3 n", the instrument would play "D#3", because C#1 is one semitone higher than C-1, so the final note is one semitone higher than the track note.