Frequently Asked Questions
Note
We have a big database with Frequently Asked Questions in our Community Forums. Please have a look at it.
Contents
General
What is PlatformIO?
Please refer to What is PlatformIO?
What is .pio directory
Please refer to workspace_dir.
What is .pioenvs directory
Please refer to build_dir.
Command completion in Terminal
Please refer to PlatformIO Shell Completion.
Install Python Interpreter
PlatformIO Core (CLI) is written in Python that is installed by default on the all popular OS except Windows.
Please navigate to official website and Download the latest Python and install it. Please READ NOTES BELOW.
- macOS
Please read the “Important Information” displayed during installation for information about SSL/TLS certificate validation and the running the “Install Certificates.command”.
If you do not install SSL/TLS certificates, PlatformIO will not be able to download dependent packages, libraries, and toolchains.
- Windows
Please select
Add Python to Path(see below), otherwise,pythoncommand will not be available.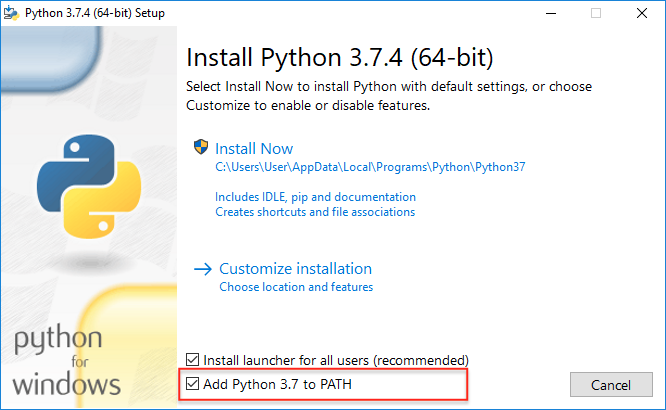
Convert Arduino file to C++ manually
Some Cloud & Desktop IDE doesn’t support Arduino files (*.ino and .pde) because
they are not valid C/C++ based source files:
Missing includes such as
#include <Arduino.h>Function declarations are omitted.
In this case, code completion and code linting do not work properly or are disabled. To avoid this issue you can manually convert your INO files to CPP.
For example, we have the next Demo.ino file:
void setup () {
    someFunction(13);
}

void loop() {
    delay(1000);
}

void someFunction(int num) {
}
Let’s convert it to Demo.cpp:
Add
#include <Arduino.h>at the top of the source fileDeclare each custom function (excluding built-in, such as
setupandloop) before it will be called.
The final Demo.cpp:
#include <Arduino.h>

void someFunction(int num);

void setup () {
    someFunction(13);
}

void loop() {
    delay(1000);
}

void someFunction(int num) {
}
Finish.
Program Memory Usage
PlatformIO calculates firmware/program memory usage based on the next segments:
.textThe code segment, also known as a text segment or simply as text, is where a portion of an object file or the corresponding section of the program’s virtual address space that contains executable instructions is stored and is generally read-only and fixed size.
.dataThe .data segment contains any global or static variables which have a pre-defined value and can be modified. The values for these variables are initially stored within the read-only memory (typically within
.text) and are copied into the.datasegment during the start-up routine of the program. Example,int val = 3; char string[] = "Hello World";
.bssUninitialized data is usually adjacent to the data segment. The BSS segment contains all global variables and static variables that are initialized to zero or do not have explicit initialization in the source code. For instance, a variable defined as
static int i;would be contained in the BSS segment.
The rough calculation could be done as:
PROGRAM (Flash) =
.text+.dataDATA (RAM) =
.bss+.data
If you need to print all memory sections and addresses, please use
platformio run --verbose command.
Recommended for reading:
Advanced Serial Monitor with UI
PlatformIO Core provides CLI version (platformio device monitor) of Serial Monitor. If you need advanced instrument with a rich UI, we recommend free and multi-platform CoolTerm serial port terminal application.
Warning
Please note that you need to manually disconnect (close serial port connection) in CoolTerm before doing uploading in PlatformIO. PlatformIO can not disconnect/connect to a target device automatically when CoolTerm is used.
Troubleshooting
Installation
Multiple PIO Cores in a system
Multiple standalone PlatformIO Core (CLI) in a system could lead to the different issues. We highly recommend to keep one instance of PIO Core or use built-in PIO Core in PlatformIO IDE:
PlatformIO IDE for Atom -
Menu PlatformIO: Settings > PlatformIO IDE > Use built-in PlatformIO CoreVSCode - Settings > Set
platformio-ide.useBuiltinPIOCoretotrue.
Finally, if you have a standalone PlatformIO Core (CLI) in a system, please open system Terminal (not PlatformIO IDE Terminal) and uninstall obsolete PIO Core:
pip uninstall platformio

# if you used macOS "brew"
brew uninstall platformio
If you need to have PlatformIO Core (CLI) globally in a system, please Install Shell Commands.
‘platformio’ is not recognized as an internal or external command
If you use PlatformIO IDE, please check in PlatformIO IDE Settings that “Use built-in PIO Core” is enabled.
If you modify system environment variable PATH in your Bash/Fish/ZSH
profile, please do not override global PATH. This line
export PATH="/my/custom/path" is incorrect. Use export PATH="/my/custom/path":$PATH
instead.
99-platformio-udev.rules
Linux users have to install udev rules for PlatformIO supported boards/devices. The latest version of rules may be found at https://raw.githubusercontent.com/platformio/platformio-core/master/scripts/99-platformio-udev.rules
Note
Please check that your board’s PID and VID are listed in the rules. You can list connected devices and their PID/VID using platformio device list command.
This file must be placed at /etc/udev/rules.d/99-platformio-udev.rules
(preferred location) or /lib/udev/rules.d/99-platformio-udev.rules
(required on some broken systems).
Please open system Terminal and type
# Recommended
curl -fsSL https://raw.githubusercontent.com/platformio/platformio-core/master/scripts/99-platformio-udev.rules | sudo tee /etc/udev/rules.d/99-platformio-udev.rules

# OR, manually download and copy this file to destination folder
sudo cp 99-platformio-udev.rules /etc/udev/rules.d/99-platformio-udev.rules
Restart “udev” management tool:
sudo service udev restart

# or

sudo udevadm control --reload-rules
sudo udevadm trigger
Ubuntu/Debian users may need to add own “username” to the “dialout” group if they are not “root”, doing this issuing
sudo usermod -a -G dialout $USER
sudo usermod -a -G plugdev $USER
Similarly, Arch users may need to add their user to the “uucp” group
sudo usermod -a -G uucp $USER
sudo usermod -a -G lock $USER
Note
You will need to log out and log back in again (or reboot) for the user group changes to take effect.
After this file is installed, physically unplug and reconnect your board.
ImportError: cannot import name _remove_dead_weakref
Windows users can experience this issue when multiple Python interpreters are installed in a system and conflict each other. The easy way to fix this problem is uninstalling all Python interpreters using Windows Programs Manager and installing them manually again.
“Windows > Start Menu > Settings > System > Apps & Features”, select Python interpreters and uninstall them.
Install the latest Python interpreter, see Install Python Interpreter guide
Remove
C:\Users\YourUserName\.platformioandC:\.platformiofolders if exist (do not forget to replace “YourUserName” with the real user name)Restart PlatformIO IDE.
Package Manager
[Error 5] Access is denied
PlatformIO installs all packages to “core_dir/packages” directory. You MUST HAVE write access to this folder. Please note that PlatformIO does not require “sudo”/administrative privileges.
Solution 1: Remove folder
A quick solution is to remove “core_dir/packages” folder and repeat installation/building/uploading again.
Solution 2: Antivirus
Some antivirus tools forbid programs to create files in the background. PlatformIO Package Manager does all work in the background: downloads package, unpacks archive in temporary folder and moves final files to “core_dir/packages” folder.
Antivirus tool can block PlatformIO, that is why you see “[Error 5] Access is denied”. Try to disable it for a while or add core_dir directory to exclusion/whitelist.
Solution 3: Run from Terminal
As we mentioned in “Solution 2”, antivirus tools can block background file system operations. Another solution is to run PlatformIO Core (CLI) from a system terminal.
Open System Terminal, on Windows
cmd.exe(not PlatformIO IDE Terminal)Build a project and upload firmware using PlatformIO Core (CLI) which will download and install all dependent packages:
# Change directory to PlatformIO Project where is located "platformio.ini"
cd path/to/platformio/project

# Force PlatformIO to install PIO Home dependencies
platformio home

# Force PlatformIO to install toolchains
platformio run --target upload
If “platformio” command is not globally available in your environment and you use PlatformIO IDE, please use built-in PlatformIO Core (CLI) which is located in:
Windows:
C:\Users\{username}\.platformio\penv\Scripts\platformioPlease replace{username}with a real user nameUnix:
~/.platformio/penv/bin/platformio
Note
You can add platformio and pio commands to your system environment.
See Install Shell Commands.
Solution 4: Manual
If none of the solutions above do work for you, you can download and unpack all packages manually to “core_dir/packages”.
Please visit PlatformIO Package Storage and download a package for your platform. A correct package path is “core_dir/packages/{package_name}/package.json”.
Building
UnicodeWarning: Unicode equal comparison failed
Full warning message is “UnicodeWarning: Unicode equal comparison failed to convert both arguments to Unicode - interpreting them as being unequal”.
KNOWN ISSUE. Please move your project to a folder which full path does not contain non-ASCII chars.
UnicodeDecodeError: Non-ASCII characters found in build environment
KNOWN ISSUE. PlatformIO Core (CLI) currently does not support projects which contain non-ASCII characters (codes) in a full path or depend on the libraries which use non-ASCII characters in their names.
TEMPORARY SOLUTION
Use PlatformIO IDE, it will automatically install PlatformIO Core (CLI) in a root of system disk (
%DISK%/.platformio) and avoid an issue when system User contains non-ASCII charactersDo not use non-ASCII characters in project folder name or its parent folders.
Also, if you want to place PlatformIO Core (CLI) in own location, see:
Set
PLATFORMIO_CORE_DIRenvironment variable with own pathConfigure custom location per project using core_dir option in “platformio.ini” (Project Configuration File).
Monitoring a serial port breaks upload
Answered in issue #384.