PlatformIO IDE for Atom
PlatformIO IDE is the next-generation integrated development environment for IoT.
Cross-platform build system without external dependencies to the OS software:
800+ Boards
20+ Frameworks
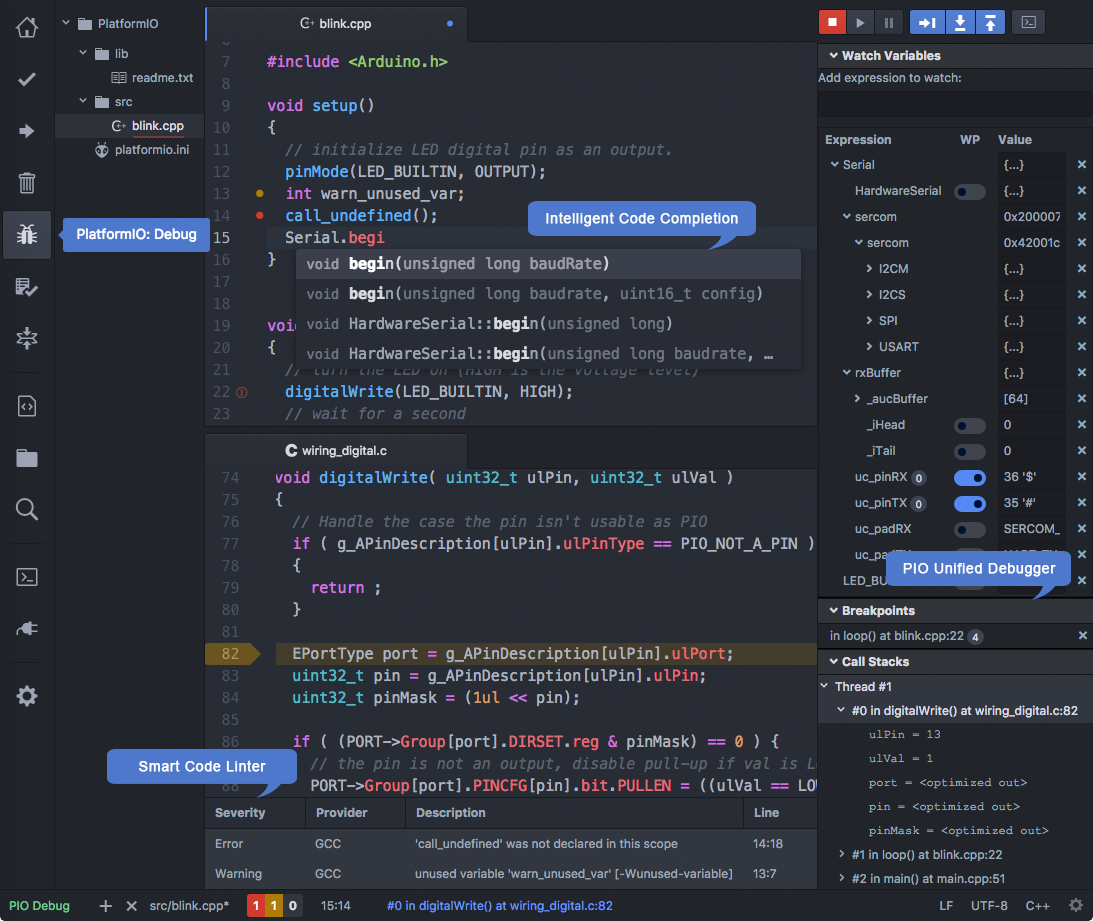
C/C++ Intelligent Code Completion
C/C++ Smart Code Linter for rapid professional development
Library Manager for the hundreds popular libraries
Multi-projects workflow with multiple panes
Themes support with dark and light colors
Serial Port Monitor
Built-in Terminal with PlatformIO Core (CLI) and CLI tool (
pio,platformio)Built-in PlatformIO Home.
Atom is a text editor that’s modern, approachable, yet hackable to the core—a tool you can customize to do anything but also use productively without ever touching a config file.
Contents
Installation
Note
Please note that you do not need to install PlatformIO Core (CLI) separately if you are going to use PlatformIO IDE for Atom. PlatformIO Core (CLI) is built into PlatformIO IDE and you will be able to use it within PlatformIO IDE Terminal.
Also, PlatformIO IDE allows one to install PlatformIO Core (CLI) Shell Commands
(pio, platformio) globally to your system via
Menu: PlatformIO > Install Shell Commands.
I. Atom
Download and install GitHub’s official Atom text editor. PlatformIO IDE is built on top of it.
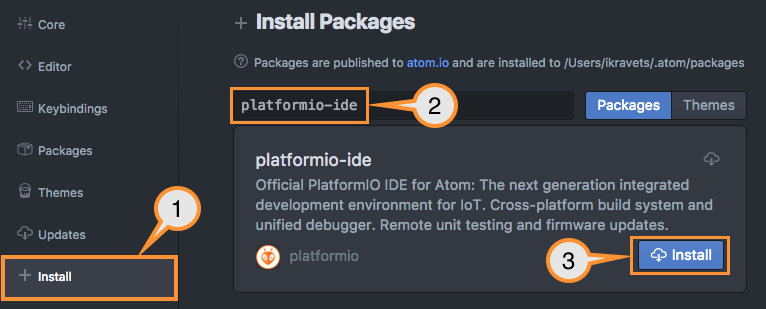
Open Atom Package Manager
Mac OS X,
Menu: Atom > Preferences > InstallWindows,
Menu: File > Settings > InstallLinux,
Menu: Edit > Preferences > Install
Search for the official
platformio-idepackageInstall PlatformIO IDE.
II. Clang for Intelligent Code Completion
PlatformIO IDE uses Clang for the Intelligent Code
Completion. To check that clang is available in your system, please
open Terminal and run clang --version. If clang is not installed,
then install it and restart Atom:
Mac OS X: Install the latest Xcode along with the latest Command Line Tools (they are installed automatically when you run
clangin Terminal for the first time, or manually by runningxcode-select --installWindows: Download Clang 3.9.1 for Windows. Please select “Add LLVM to the system PATH” option on the installation step.
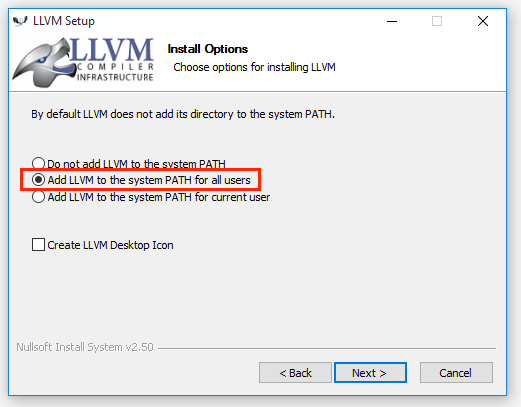
Warning
PLEASE DO NOT INSTALL CLANG 4.0. TEMPORARILY, WE SUPPORT ONLY CLANG 3.9.
If you see a
Failed to find MSBuild toolsets directoryerror in the installation console, please ignore it and press any key to close this window. PlatformIO IDE uses only the Clang completion engine, which should work after that without any problems.Linux: Using package managers:
apt-get install clangoryum install clang.Other Systems: Download the latest Clang for the other systems.
Warning
If some libraries are not visible in PlatformIO IDE for Atom and Code Completion or
Code Linting does not work properly, please perform Menu: PlatformIO >
Rebuild C/C++ Project Index (Autocomplete, Linter)
Quick Start
This tutorial introduces you to the basics of PlatformIO IDE workflow and shows you the creation process for a simple “Blink” example. After finishing, you will have a general understanding of how to work with projects in the IDE.
Launch
After installation, launch PlatformIO IDE by opening Atom. Once Atom is
opened, the PlatformIO IDE auto installer will continue to install dependent packages
and PlatformIO Core (CLI). Please be patient and let the installation complete. Once finished,
PlatformIO IDE will ask you to reload the Atom window to apply
installed components. Please click on Reload Now. After that, PlatformIO IDE is
ready for use. Happy coding!
Setting Up the Project
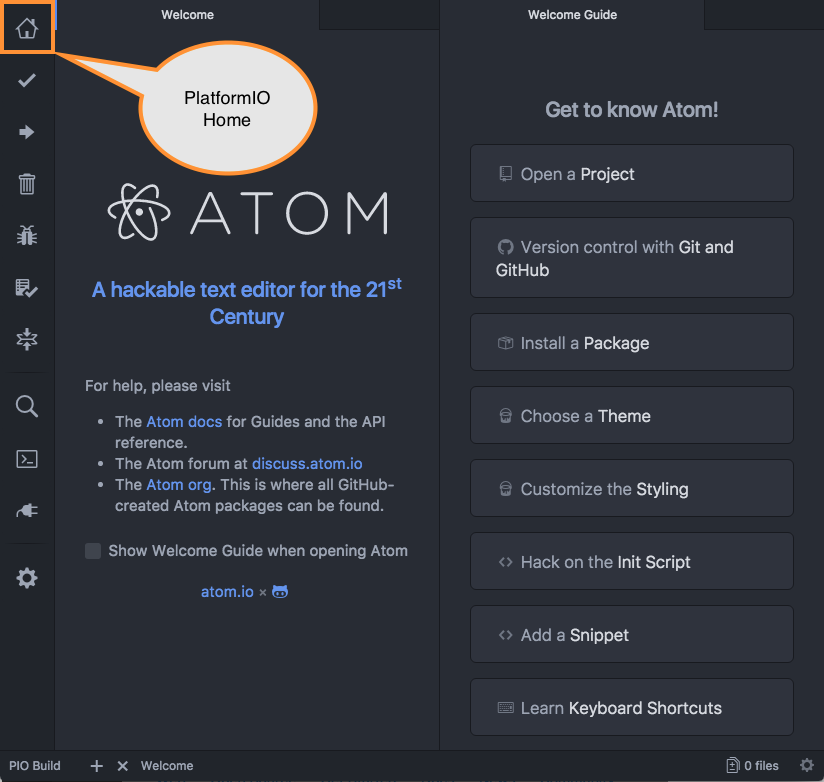
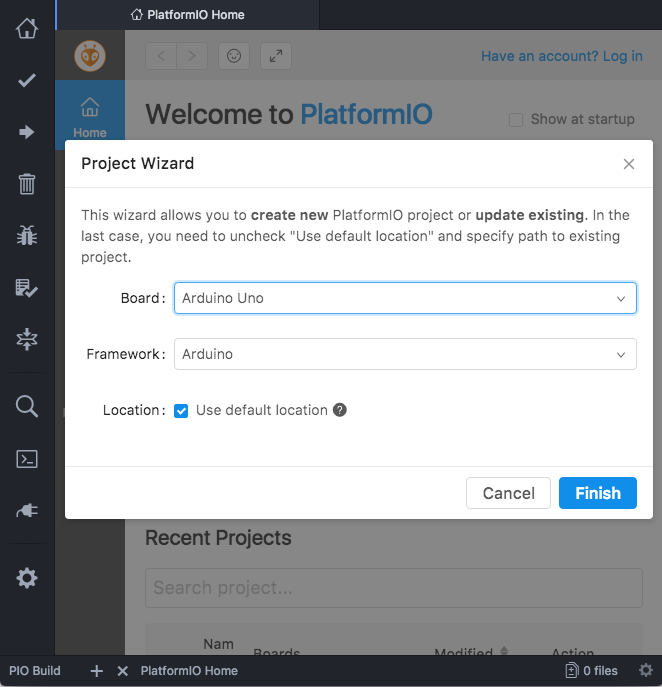
Click on the “PlatformIO Home” button on the PlatformIO Toolbar
Click on “New Project”, select a board and create a new PlatformIO Project
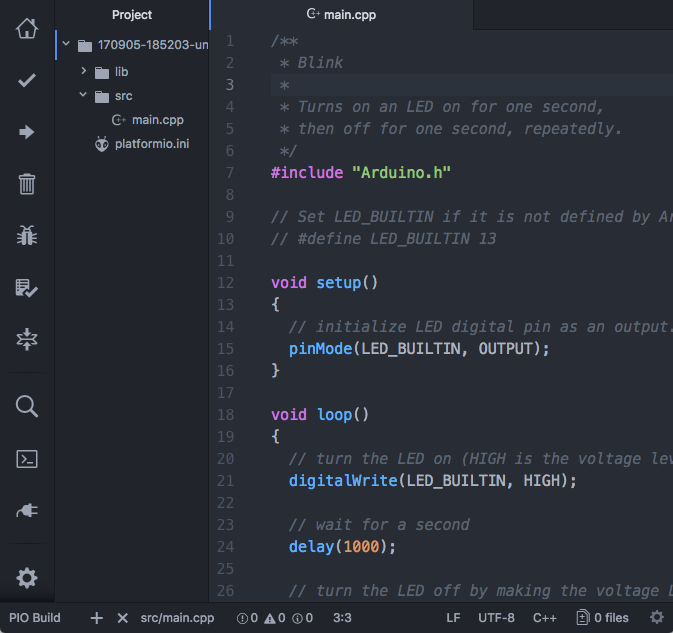
Open the
main.cppfile in thesrcfolder and replace its contents with the following:
Warning
The code below only works with Arduino-based boards. Please visit the PlatformIO Project Examples repository for other pre-configured projects.
/**
 * Blink
 *
 * Turns on an LED on for one second,
 * then off for one second, repeatedly.
 */
#include "Arduino.h"

// Set LED_BUILTIN if it is not defined by Arduino framework
// #define LED_BUILTIN 13

void setup()
{
  // initialize LED digital pin as an output.
  pinMode(LED_BUILTIN, OUTPUT);
}

void loop()
{
  // turn the LED on (HIGH is the voltage level)
  digitalWrite(LED_BUILTIN, HIGH);

  // wait for a second
  delay(1000);

  // turn the LED off by making the voltage LOW
  digitalWrite(LED_BUILTIN, LOW);

   // wait for a second
  delay(1000);
}
Process Project
PlatformIO IDE proposes different ways to process the project (build, clean, upload firmware, run other targets) using:
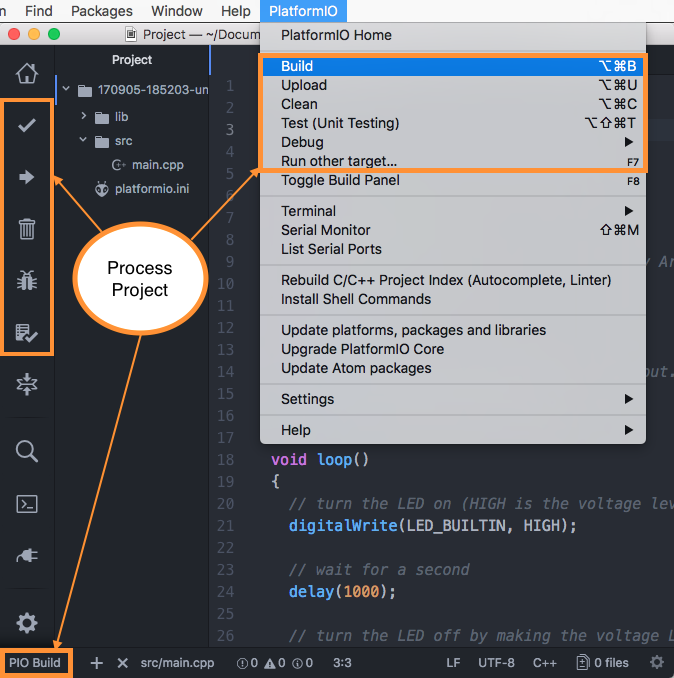
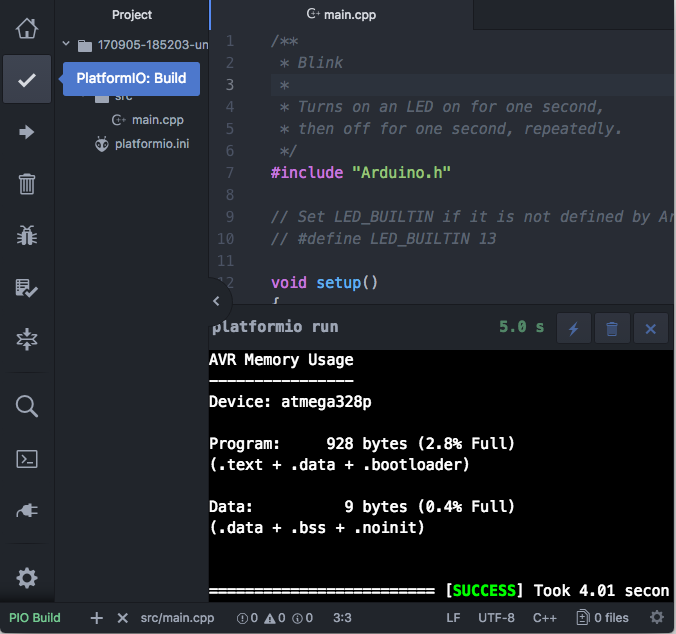
Run
Buildand you should see a green “success” result in the build panel:
To upload firmware to the board, run Upload.
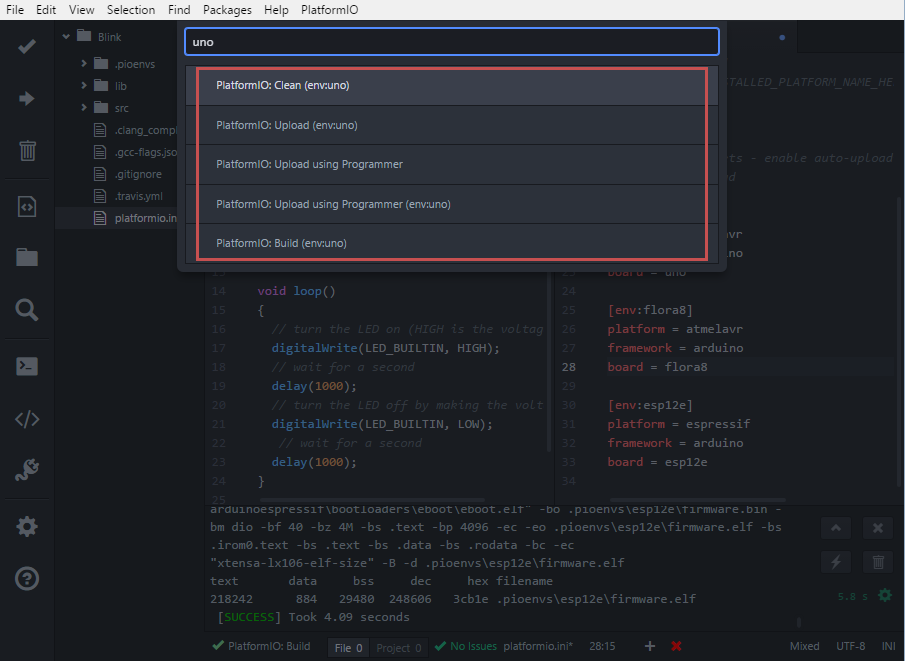
What is more, you can run specific target or process project environment using
Menu: PlatformIO > Run other target...or call targets list from the status bar (bottom, left corner):
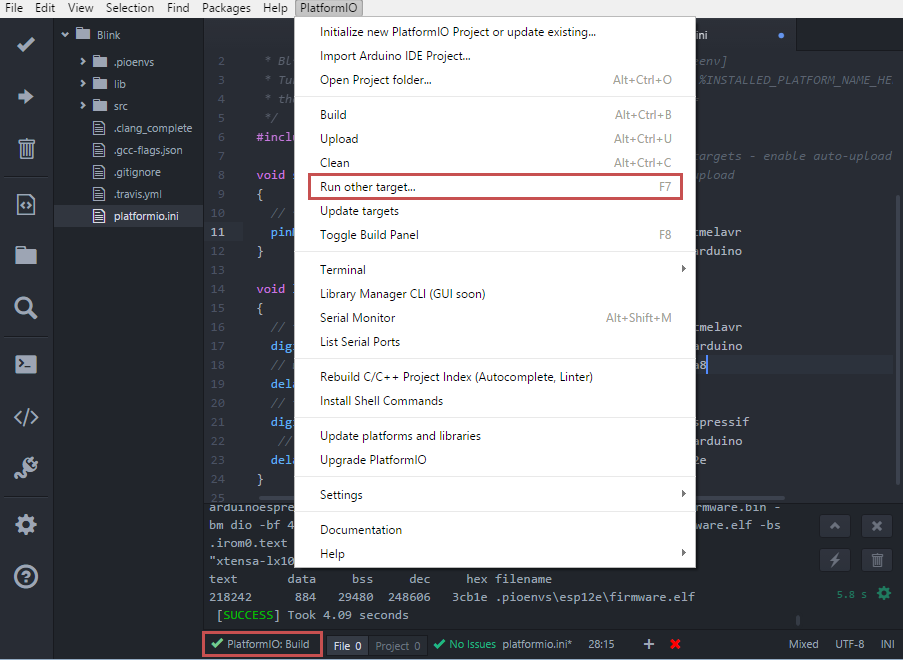
And select desired target:
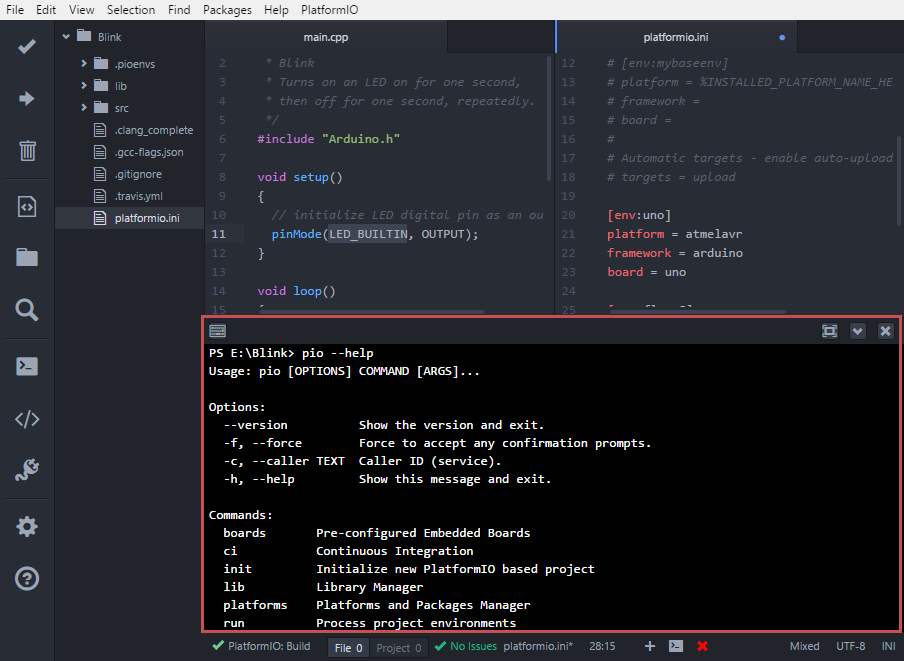
To launch the built-in terminal interface, choose
Menu: PlatformIO > Terminalor press the corresponding icon in the PlatformIO toolbar:
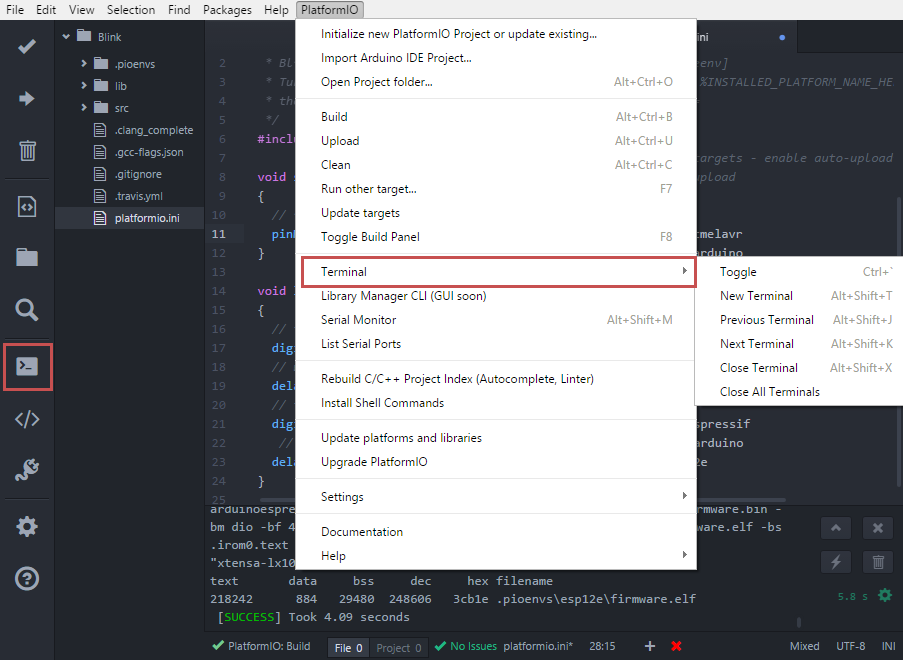
This provides you fast access to a set of powerful PlatformIO Core (CLI) CLI commands:
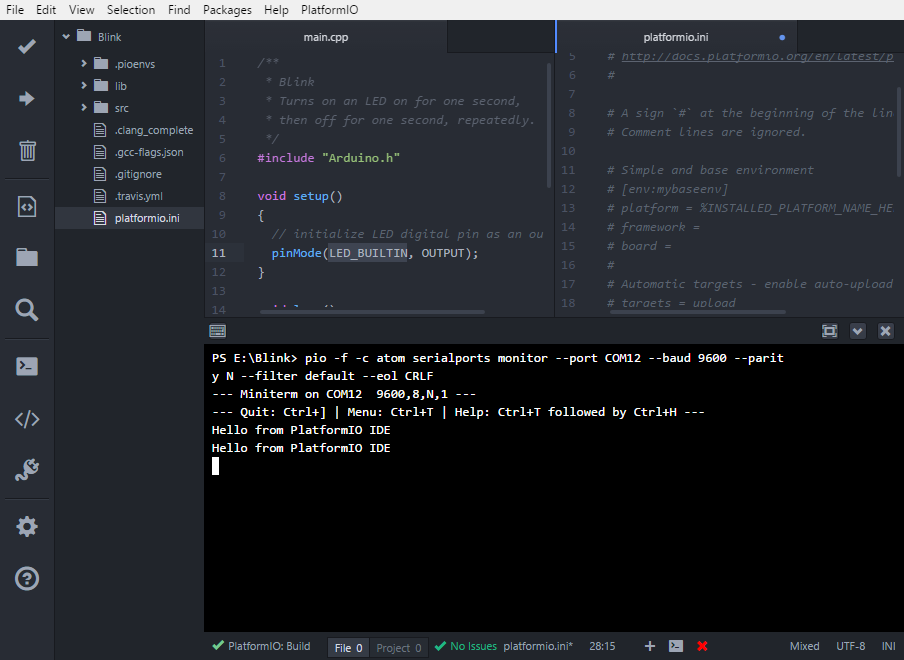
To run the built-in “Serial Monitor”, choose
Menu: PlatformIO > Serial Monitoror press the corresponding icon in the PlatformIO toolbar:
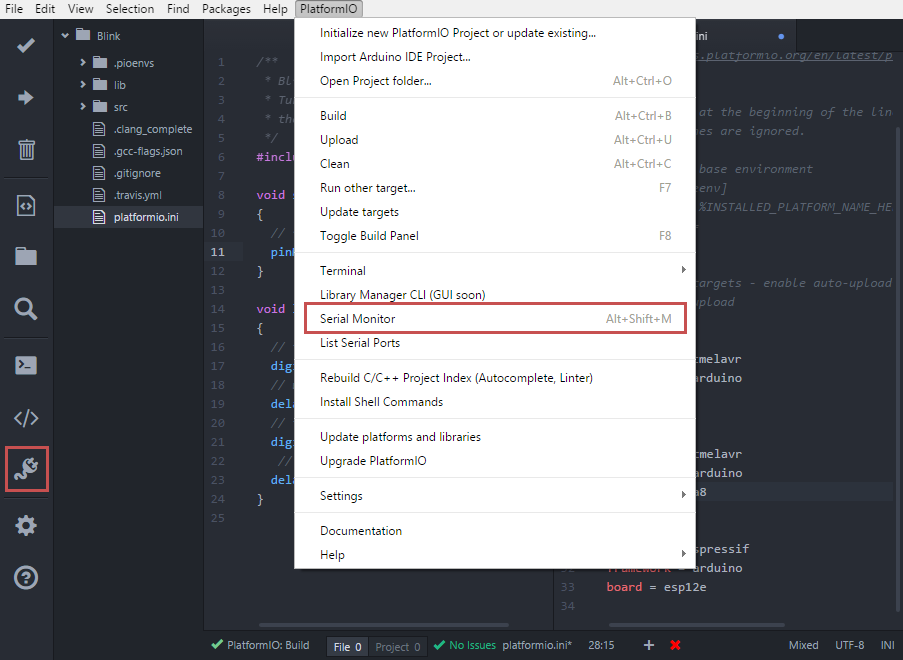
The monitor has several settings to adjust your connection:

It also allows you to communicate with your board in an easy way:
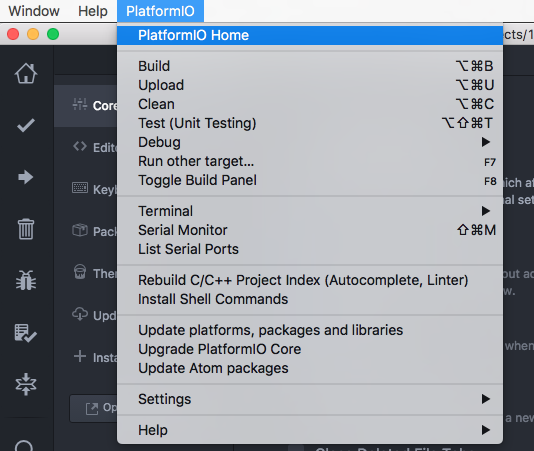
Menu item PlatformIO
platformio-ide package adds to Atom
new menu item named Menu: PlatformIO (after Menu: Help item).
PlatformIO Toolbar
PlatformIO IDE Toolbar contains quick access buttons for the popular commands. Each button contains a hint (leave the mouse on it for a moment).

PlatformIO: Build
PlatformIO: Upload
PlatformIO: Clean
Run other target (Build environments, PIO Unit Testing)
Toggle build panel
||
Find in Project…
PIO Terminal
Serial Monitor
||
Atom Settings
Building / Uploading / Targets
cmd-alt-b/ctrl-alt-b/f9builds project without auto-uploading.cmd-alt-u/ctrl-alt-ubuilds and uploads (if no errors).cmd-alt-c/ctrl-alt-ccleans compiled objects.cmd-alt-t/ctrl-alt-t/f7run other targets (Upload using Programmer, Upload SPIFFS image, Update platforms and libraries).cmd-alt-g/ctrl-alt-g/f4cycles through causes of build error.cmd-alt-h/ctrl-alt-h/shift-f4goes to the first build error.cmd-alt-v/ctrl-alt-v/f8toggles the build panel.escapeterminates build / closes the build window.
More options: Menu: PlatformIO > Settings > Build.
Intelligent Code Completion
PlatformIO IDE uses clang for the Intelligent Code Completion. To install it or check if it is already installed, please follow see the step II. Clang for Intelligent Code Completion from Installation guide.
Warning
The libraries which are added/installed after the initializing process will
not be reflected in the code linter. You need Menu: PlatformIO >
Rebuild C/C++ Project Index (Autocomplete, Linter).
Smart Code Linter
PlatformIO IDE uses PlatformIO’s pre-built GCC toolchains for Smart Code Linter
and rapid professional development.
The configuration data are located in .gcc-flags.json. This file will be
automatically created and preconfigured when you initialize project using
Menu: PlatformIO > Initialize new PlatformIO Project or update existing....
Warning
If some libraries are not visible in PlatformIO IDE for Atom and Code Completion or
Code Linting does not work properly, please perform Menu: PlatformIO >
Rebuild C/C++ Project Index (Autocomplete, Linter)
Install Shell Commands
Please navigate to PIO Core Install Shell Commands.
Known issues
Smart Code Linter is disabled for Arduino files
Smart Code Linter is disabled by default for Arduino files
(*.ino and .pde) because they are not valid C/C++ based
source files:
Missing includes such as
#include <Arduino.h>Function declarations are omitted.
There are two solutions:
Convert Arduino file to C++ manually
Recommended! See Convert Arduino file to C++ manually.
Force Arduino file as C++
To force Smart Code Linter to use Arduino files as C++ please
Open
.gcc-flags.jsonfile from the Initialized/Imported project and add-x c++flag at the beginning of the value ofgccDefaultCppFlagsfield:
{
  "execPath": "...",
  "gccDefaultCFlags": "...",
  "gccDefaultCppFlags": "-x c++ -fsyntax-only ...",
  "gccErrorLimit": 15,
  "gccIncludePaths": "...",
  "gccSuppressWarnings": false
}
Perform all steps from Convert Arduino file to C++ manually (without renaming to
.cpp).
Warning
Please do not modify other flags here. They will be removed on a next “Project Rebuild C/C++ Index” stage. Please use build_flags for “platformio.ini” (Project Configuration File) instead.
Arch Linux: PlatformIO IDE Terminal issue
Please read this article Installing PlatformIO on Arch Linux.
Frequently Asked Questions
Keep build panel visible
PlatformIO IDE hides build panel on success by default. Nevertheless, you can
keep it visible all time. Please follow to
Menu: PlatformIO > Settings > Build and set Panel Visibility to
Keep Visible.
Key-bindings (toggle panel):
cmd+alt+v- Mac OS Xctrl+alt+v- Windows/Linux
Automatically save on build
If you want automatically save all edited files when triggering a build, please follow to
Menu: PlatformIO > Settings > Build and check Automatically save on build.
Jump to Declaration
Click on a function/include, press F3 and you will be taken directly to
the declaration for that function.
Code Formatting
You need to install atom-beautify package and C/C++ Uncrustify Code Beautifier.
Uninstall Atom with PlatformIO IDE
Here’s how to uninstall the PlatformIO IDE for multiple OS.
See Uninstall PIO Core and dependent packages, if you do not need it in a system.
Windows
Uninstall Atom using “Start > Control Panel > Programs and Features > Uninstall”
Remove
C:\Users\<user name>\.atomfolder (settings, packages, etc…)Remove
C:\Users\<user name>\AppData\Local\atomfolder (application itself)Remove
C:\Users\<user name>\AppData\Roaming\Atomfolder (cache, etc.)Remove registry records using
regedit:HKEY_CLASSES_ROOT\Directory\Background\shell
HKEY_CLASSES_ROOT\Directory\shell
HKEY_CLASSES_ROOT*\shell
macOS
Run these commands in system Terminal
rm -rf ~/.atom
rm /usr/local/bin/atom
rm /usr/local/bin/apm
rm -rf /Applications/Atom.app
rm ~/Library/Preferences/com.github.atom.plist
rm ~/Library/Application\ Support/com.github.atom.ShipIt
rm -rf ~/Library/Application\ Support/Atom
rm -rf ~/Library/Saved\ Application\ State/com.github.atom.savedState
rm -rf ~/Library/Caches/com.github.atom
rm -rf ~/Library/Caches/Atom
Articles / Manuals
Mar, 31, 2017 - Robin Reiter - A little guide to PlatformIO. As an Arduino developer, you may want to check that out! (video review)
Dec 13, 2016 - Dr. Patrick Mineault - Multi-Arduino projects with PlatformIO
Nov 10, 2016 - PiGreek - PlatformIO the new Arduino IDE ?!
Aug 18, 2016 - Primal Cortex - Installing PlatformIO on Arch Linux
Jul 26, 2016 - Embedded Systems Laboratory - แนะนำการใช้งาน PlatformIO IDE สำหรับบอร์ด Arduino และ ESP8266 (Get started with PlatformIO IDE for Arduino board and ESP8266, Thai)
May 30, 2016 - Ron Moerman - IoT Development with PlatformIO
May 01, 2016 - Pedro Minatel - PlatformIO – Uma alternativa ao Arduino IDE (PlatformIO - An alternative to the Arduino IDE, Portuguese)
Apr 23, 2016 - Al Williams - Hackaday: Atomic Arduino (and Other) Development
Apr 16, 2016 - Sathittham Sangthong - [PlatformIO] มาลองเล่น PlatformIO แทน Arduino IDE กัน (Let’s play together with PlatformIO IDE [alternative to Arduino IDE], Thai)
Apr 11, 2016 - Matjaz Trcek - Top 5 Arduino integrated development environments
Apr 06, 2016 - Aleks - PlatformIO ausprobiert (Tried PlatformIO, German)
Apr 02, 2016 - Diego Pinto - Você tem coragem de abandonar a IDE do Arduino? PlatformIO + Atom (Do you dare to leave the Arduino IDE? PlatformIO + Atom, Portuguese)
Mar 30, 2016 - Brandon Cannaday - Getting Started with PlatformIO and ESP8266 NodeMcu
Mar 12, 2016 - Peter Marks - PlatformIO, the Arduino IDE for programmers
Mar 05, 2016 - brichacek.net - PlatformIO – otevřený ekosystém pro vývoj IoT (PlatformIO – an open source ecosystem for IoT development, Czech)
Mar 04, 2016 - Ricardo Vega - Programa tu Arduino desde Atom (Program your Arduino from Atom, Spanish)
Feb 28, 2016 - Alex Bloggt - PlatformIO vorgestellt (Introduction to PlatformIO IDE, German)
Feb 25, 2016 - NutDIY - PlatformIO Blink On Nodemcu Dev Kit V1.0 (Thai)
See a full list with Articles about us.
Changelog
Please visit releases page.